Too many people these days are coming into the forums requesting help on massively infected systems. So, I thought I'd compile something for the newbies that may be useful to help prevent infections and other useless trash on your computer.
Step One: The Core
This is the single most important piece of your computer. Chances are that if there's something wrong with this, the weakest link in the chain, everything will come crashing straight on top of you. I am talking about the Single Point of Failure (SPoF) on your system - the Operating System.
This critical piece (actually, make that ultra-hyper-mega-critical) of software is what manages the entire show and you dont want any unnecessary software messing with it. Not all Operating Systems are created equal. Technically speaking, server OSes are some of the safest OSes around. But usually you cannot go around installing these OSes unless you're a total geek with around 10 computers around your home and you need software to centrally manage them. When it comes to a single desktop OS, currently Microsoft Windows XP rules the roost.
Your choice of Windows OS preference in the order of safest first is:
Windows XP Professional
Windows XP Home
Windows 2000 Professional
Windows NT 4.0
Windows 98 SE
Windows ME
Windows 98
Windows 95
I would recommend you either stick to the Windows XP OSes, Windows 2000 Professional or Windows 98 SE. Needless to say, Microsoft Windows XP is currently the most safe computing environment for a user. And that neatly brings us to our next topic.
Step Two: Patching it Up
No OS is secure if you are running it straight out of the box. A long list of vulnerabilities are detected by security experts and Microsoft routinely releases update software to address these vulnerabilities and close them. Updates may either be :
Service Packs
Critical Updates
Hotfixes
Cumulative Updates / Rollups
Hardware Updates
Optional Updates
Service Packs (SP) are comprehensive updates to the OS, fixing every single vulnerability in the OS since the release of the OS itself or the last SP release. SP's also include major OS changes, newer updates to system files and they contain every single update to the OS that has ever been released. Also, SPs are cumulative, so if you were to install SP1, it would contain every single update since the OS release and if you install SP2, it would contain every single update that has been released since SP1, and it would also include the updates of SP1 also. So, if you are patching an OS with an SP, you dont have to go around installing SP1, then SP2, SP3, etc. Installing the latest SP would mean you're getting all the updates. The latest SPs for the various OS are:
Windows XP - SP2:
The best way to get SP2 for Windows XP is either via Automatic Updates (I will get to this later), Windows Update, ordering the free Service Pack 2 from Microsoft. However, if you want to download it yourself, a larger network install can be downloaded http://www.microsoft.com/downloads/details.aspx?FamilyId=049C9DBE-3B8E-4F30-8245-9E368D3CDB5A&displaylang=en
Microsoft only releases an SP for the OSes that can be used as full-fledged network clients, so there are no SPs for Windows ME, 98 SE, 98 and 95, only the standalone updates. However, an Unofficial SP exists for Microsoft Windows 98 SE.
Critical Updates are those very important updates that Microsoft releases in response to a threat against the Windows OS. There is no option and these should not be avoided. Installing these updates is a must if you dont want your system exploited or open to infection. Microsoft usually releases a slew of these updates every month.
Hotfixes are patches to existing Windows components that address a vulnerability in the code and are released as and when the vulnerabilities are discovered. Needless to say, you need these as well if you want to protect your OS.
Cumulative Updates and security Rollups are a bunch of related updates and hotfixes that enhance the security of the Windows component and also patch any existing unpatched vulnerability. Of course, you need these too.
Hardware Updates can sometimes be found on Windows Update when your hardware manufacturer, like your motherboard manufacturer, releases patches, fixes and updates that usually add functionality and improve performance of your hardware components. While these updates are optional, it is recommended that you install them because they often boost your hardware's performance and provide newer functionality that you can take advantage of.
Optional Updates are just that. They're optional and its your choice whether you wish to update/upgrade them. Usually, these fall in the category of extra tools for the Windows OS such as a newer Media Player, a Journal Viewer, Movie Editing Software, software to make applications programmed in the .NET environment to work, etc. You can safely ignore these updates if you are not planning to use them.
Microsoft releases a number of updates on the second Tuesday of every month, which many of us geeks fondly call "Patch Tuesday". Make sure you bookmark this day in your calendar each month and check for updates. Also, if a threat is severe enough, it may make the people at Microsoft release an update before the planned Patch Tuesday.
Also, most programs have updates for themselves. While some are improvements on features, its not uncommon for products to include security enhancements as well. Keep track of the products you're using and check for updates for your software products regularly. This is especially important when it comes to Microsoft Office products as their updates can have a significant impact on sysem security. You can always visit Office Update to check for the latest updates to your Office products.
Step Two Point Five: Honesty Pays
It is worthwhile to mention that when it comes to Windows OSes, it is better to pay for a legal, genuine copy of the OS to enable you to get the latest updates without a hassle. When it comes to Windows XP, it will not allow you to install a genuine copy of the SP or some critical fixes unless you have a legit version of the OS. Yes, cracked SPs exist and you can always install them, but you will be doing the world a lot of good, not to mention yourself, if you just get yourself a legit copy of at least Windows XP Home. You just spent over 20,000 on that new computer, the least you can do is spend another 4000 and live quite happily afterwards.
Step Three: Securing the OS
Here we will take a look at securing the OS itself without using any third party software. The most important tool here is the "Automatic Updates" option. You can usually find this option in the Control Panel, if you are running Windows ME, Windows 2000 (with the appropriate SP) or Windows XP.
When you open the Automatic Updates option, you will be faced with a couple of options including (exact wordings may differ)
Automatically Download and Install Updates
Download Updates but let me choose when to install them
Notify me of updates but do not automatically download or install them
Turn off Automatic Updates
It is recommended that you select Option 3 - "Notify me of updates but do not automatically download or install them" instead of Option 4, turning off the Auto Update feature. This way, when an important update is released, the Automatic Updates feture will inform you that updates are available for your OS and you can go to Windows Update and download and install them at your convenience. Also this way, you can tell when an update is being offered before the Patch Tuesday cycle and stay protected.
Windows XP comes with a built in Firewall to protect your computer, but its not a worthy solution when compared to a standalone firewall, so I will skip that in favor of a third party firewall solution.
Also, make sure you secure your user account with a password so that no one can fiddle with your system in your absence and then damage the OS.
Windows XP, when patched with Service Pack 2, comes with a Security Center option that can be accessed via the Control Panel. When you restart your computer after installing SP2, you will be prompted to choose an Automatic Updates method (1 out of the 4 choices) The Security Center also monitors the status of the built-in Windows Firewall, which is enabled by default and also the status of your antivirus program, whether it is on, turned off or if it requires an update. However, it only works with well known antivirus solutions. If any of these components are not working right or are turned off or disabled, the Security Center will pop up a warning in your system tray notification area, alerting you.
(via dctorrent)
Technorati Tags :
HOWTO - Protecting your Windows systemToo many people these days are coming into tvhe forums requesting help on massively infected systems. So, I thought I'd compile something for the newbies that may be useful to prevent infections and other useless trash computer.Windows XP Professional Home 98
Read More......
HOWTO - Protecting your Windows systemToo many people these days are coming into tvhe forums requesting help on massively infected systems. So, I thought I'd compile something for the newbies that may be useful to prevent infections and other useless trash computer.Windows XP Professional Home 98
 all of them who are using blogger beta templates have been trying to get three column templates and also tried to add javascript widgets above and below post.Here i will tell you the step to hack blogger beta to get three column templates and also to add widgets were ever you want.
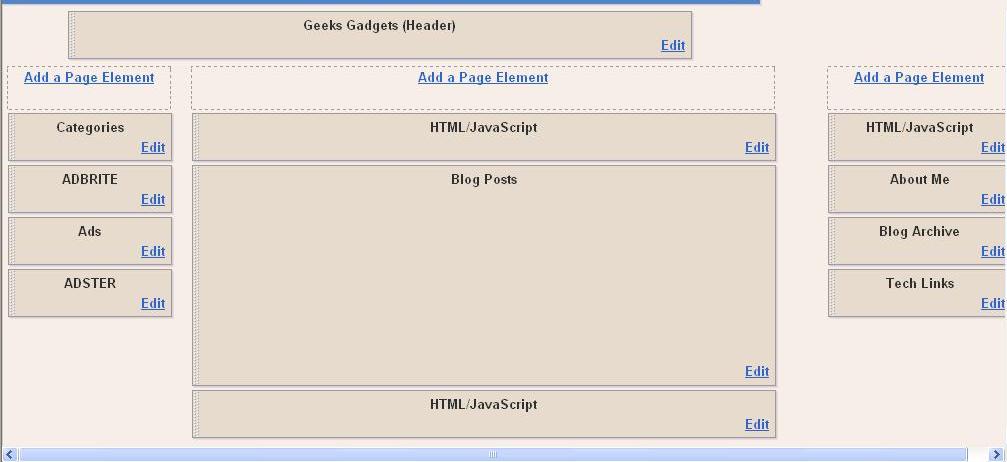
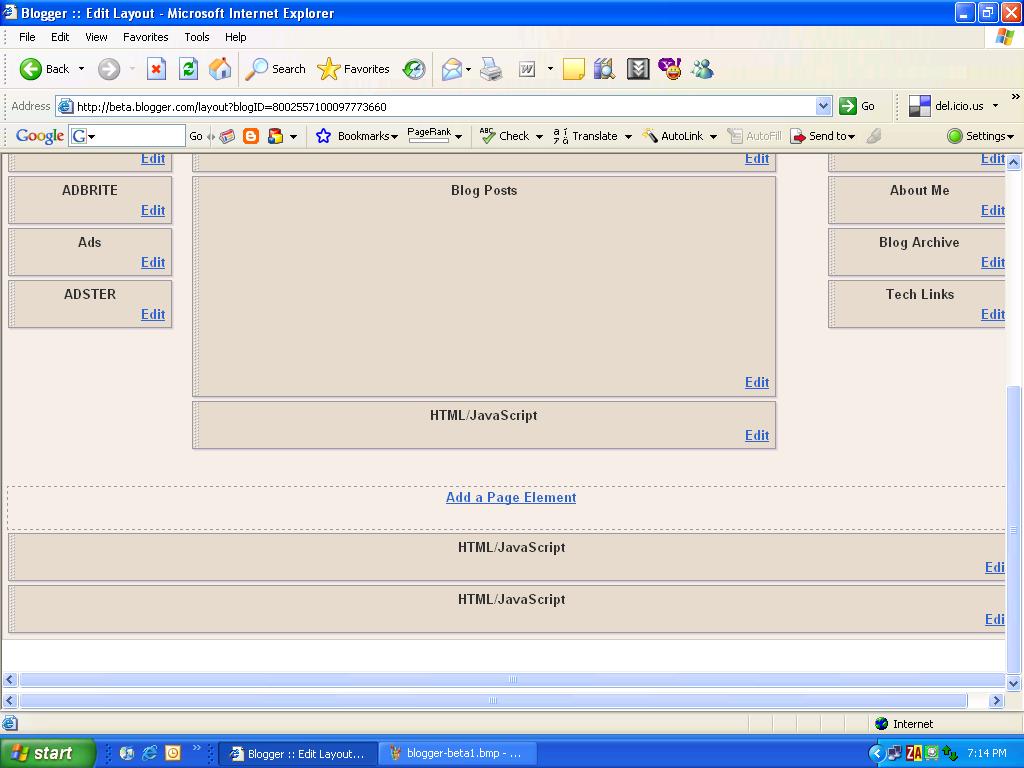
These are the sample screenshots of templates build by hacking into blogger beta..
First Of all Choose The template Which u Want.Then just do the following........
step :1-
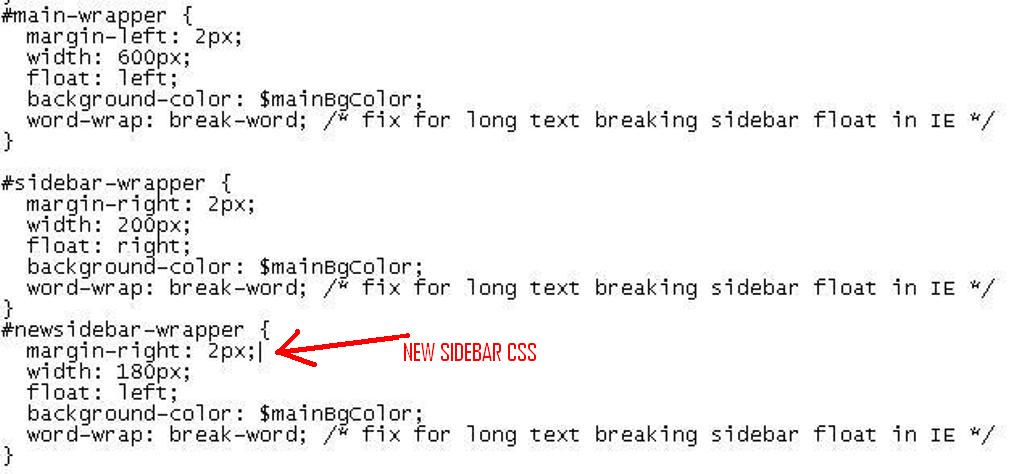
First u have to add the css for new sidebar with float:left
Step -2:-

next is to add left sidebar in the body content so u have to add the same code expect change the css file.
Step-3:-
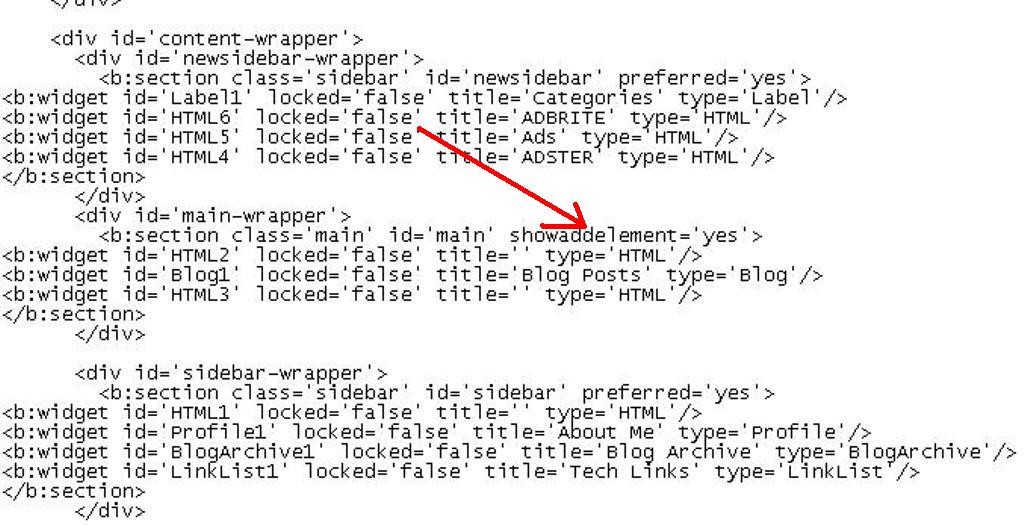
Next is to modify showaddelement="yes"...which will allow u to add new javascript codes...
To arrange it perfectly u have to change the pixel arrangement in Css and modify based A u wish...
Read More......Social Bookmarking is the craze right now. For web surfers they provide a convenient way to find intresting websites and valuable information. For webmasters, social bookmarking websites offer a huge potential for insane traffic and are a great viral marketing strategy. Below is a list I've made for myself, feel free to use it as well.
Take Some Consideration Before Posting
(Categories Are Involved)
http://digg.com
http://www.shadows.com
http://www.blinklist.com
http://www.viralcow.com
http://www.commontimes.org
http://www.shoutwire.com
http://www.fark.com
http://www.web-feeds.com
http://www.bibilog.com/
http://www.hypersuper.com/
http://aworldofhelp.com/
http://www.monkeyfilter.com/
http://www.linkswarm.com/
Bookmark/Post Whatever Sites
http://reddit.com
http://del.icio.us
http://de.lirio.us
http://www.scuttle.org
http://www.spurl.net
http://www.simpy.com
http://www.maple.nu
http://givealink.org
http://www.jots.com
http://www.zurpy.com
http://feedmelinks.com
http://www.fazed.org/
Must Be Approved By Editor Before Posted
http://www.i-am-bored.com
http://boingboing.net/
Suggest As You Surf Sites:
http://www.stumbleupon.com
http://www.furl.net
(via joehays)
Read More......TV capturing and producing High quality Videos is very lenghty and tiring process if u dont know anything, and this Tutorial is going to make everything simple for you. It took me six months to learn several aspects of this process.
Steps before Setting up your TV Tuner.
1. First and very Important step is to confirm that you get Cable Connection directly from the Emplifier and to the max only ONE Split in the connection 
2. I use PINNACLE PCTV.Experts suggest to go for Pixel View TV Tuner Card so go for it if r planning to purchase a new one.
Settings in TV Tuner.
1. After Installation, run auto channel scan.
2. You can also rename the channles and u watch only selected channels then u can drag them into favourite folder for quick access.
3. You can change colour settings as per your requirement, but I prefer not to change it and let it remain as DEFAULT.
4. Select "2 fields deInterlaced" option in Video Display. This is the MOST IMPORTANT step for clarity of Video.
5. Keep sound recordning level as low as possible. I prefer to keep at 15-20.
6. Capturing is most important part. The higher quality of video u record, higher quality of video u can produce, its as simple as that.
I record video in DVD MPEG2 format. bitrate 6 Mbits/s and Video size 720 x 576.
We are done with Settings in TV Tuner. Second part is to Make high Quality Caps
Note : Every TV Tuner has this option, which is highlighted in below image. You have to be very accurate to cap in fraction of second. But wait, we have a second option and that is VirtualDub 
Using Virtual Dub for Taking Caps :
1. Open the Video in VirtualDub. Make sure u have VDUB MPEG2.
2. See the below pic. You can see the bar... u can capture the images frame by frame here. But wait... we can use VDub features to improve the quality, which we will see in next step.
3. GO to Video > Filter > Select Deinterlace Filter > select Blend Fields together [best] option.
4. Again goto Video > Filter > select smoother > keep value as 10 or as per ur preference ;).
5. You can also crop unnecessary areas in the frame with the "cropping" option shown in the below pic.
6. If u wish to watermark ur caps / video, then there is a logo option in the filters list.
7. Now u r done with settings for making caps... u can copy the output source to clipboard and save with either paint or using photoshop ;).
Improving quality of caps in Photoshop (CS2) :
If you have taken snapshot from TV Tuner then u can directly open that in photoshop or if u r using VDUB then copy the output source clipboard and paste in photoshop.
1. Open image in photoshop. Select Filter > Noise > Dust & Scratches > Input 2 to both Radius & Threshold then press OK.
2. Again Select Filter > Noise > Reduce Noise > Enable Preview > Select Basic > Settings-Default > Strength-5 > Preserve Details-11, Reduce Color Noise-74, Sharpen Details-21. Dont forgtet to Enable Remove JPEG Artifact ;). Press OK.
All the Process is complete now.
You can alter the values according to your satisfaction.Compressing and encoding High Quality Video Using Vdub:
We have recorded the video at 6 Mbits (6000Kbps). With the help of DivX we can compress it to 1500kbps without affecting quality.
1. Remember to keep the settings we kept for TV Caps. For compressing High quality Videos u can use either DivX or Xvid codec. I prefer Divx as we are dealing with TV recorded Videos which need more workout.
2. Go to Video > Compression > Select DivX > Click Configure.
3. In Main tab > Keep Certification Profile as Unconstrained > in Bitrate > 1-pass & keep value as 1500kbps.
4. In Codec Tab > keep settings as INSANE Quality. This is MOST Important, Dont change this!!
5. In Video tab > u can keep settings as per ur preference but Do not increase the resolution of ur image. Now u can come out of DivX settings.
6. In Audio Tab > Select Full Processing Mode > Then Select Compression > MPEG LAYER - 3 > and keep 24kBits/s mono for normal video and 56kBits sterio for a video which contains music ;).
NOTE : Selecting INSANE Quality option is going to take hell lot of time so be patient. If u r in hurry u can select any of the other options but that is gonna affect quality. In Audio Compression You can select NO Compression as well, but that is gonna make file size bigger ;).
Thats all done. If you have suggetions, just comment on it.
Hard Drive MP3 Players Mice Road Warrior Essentials USB Audio DVD Writers Flash Applications Drives & Readers Host Controller Issues (Onboard, PCI, CardBus) Technology Video Capture, PVR, TV Adapters Wired, Wireless Network flash memory mp3 players joysticks, joypads keyboards usb drives gadgetry hubs webcams webcams, digital still cameras


Do you use the Run feature in Windows XP? For most, this feature remains unused (or rarely used). Why is that? Well, First off nearly all of the Run Commands Correspond to a particular Control Panel Item or a Utility, Tool or Task that can be accessed through Windows. There are, however, tools and utilities that I bet you never knew you had that can be accessed through the Run feature. The main reason most people don't use the Run feature is because they don't know the Commands. So, to solve that problem, I decided to put together the following listing, which lists 101 Run Commands and what they correspond too...
To Access........ Run Command
Accessibility Controls
access.cpl
Add Hardware Wizard
hdwwiz.cpl
Add/Remove Programs
appwiz.cpl
Administrative Tools
control.exe admintools
Automatic Updates
wuaucpl.cpl
Bluetooth Transfer Wizard
fsquirt
Calculator
calc
Certificate Manager
certmgr.msc
Character Map
charmap
Check Disk Utility
chkdsk
Clipboard Viewer
clipbrd
Command Prompt
cmd
Component Services
dcomcnfg
Computer Management
compmgmt.msc
Date and Time Properties
timedate.cpl
DDE Shares
ddeshare
Device Manager
devmgmt.msc
Direct X Control Panel (if installed)*
directx.cpl
Direct X Troubleshooter
dxdiag
Disk Cleanup Utility
cleanmgr
Disk Defragment
dfrg.msc
Disk Management
diskmgmt.msc
Disk Partition Manager
diskpart
Display Properties
control.exe desktop
Display Properties
desk.cpl
Display Properties (w/Appearance Tab Preselected)
control.exe color
Dr. Watson System Troubleshooting Utility
drwtsn32
Driver Verifier Utility
verifier
Event Viewer
eventvwr.msc
File Signature Verification Tool
sigverif
Findfast
findfast.cpl
Folders Properties
control.exe folders
Fonts
control.exe fonts
Fonts Folder
fonts
Free Cell Card Game
freecell
Game Controllers
joy.cpl
Group Policy Editor (XP Prof)
gpedit.msc
Hearts Card Game
mshearts
Iexpress Wizard
iexpress
Indexing Service
ciadv.msc
Internet Properties
inetcpl.cpl
Java Control Panel (if installed)
jpicpl32.cpl
Java Control Panel (if installed)
javaws
Keyboard Properties
control.exe keyboard
Local Security Settings
secpol.msc
Local Users and Groups
lusrmgr.msc
Logs You Out Of Windows
logoff
Mcft Chat
winchat
Minesweeper Game
winmine
Mouse Properties
control.exe mouse
Mouse Properties
main.cpl
Network Connections
control.exe netconnections
Network Connections
ncpa.cpl
Network Setup Wizard
netsetup.cpl
Nview Desktop Manager (if installed)
nvtuicpl.cpl
Object Packager
packager
ODBC Data Source Administrator
odbccp32.cpl
On Screen Keyboard
osk
Opens AC3 Filter (if installed)
ac3filter.cpl
Password Properties
password.cpl
Performance Monitor
perfmon.msc
Performance Monitor
perfmon
Phone and Modem Options
telephon.cpl
Power Configuration
powercfg.cpltion
Printers and Faxes
control.exe printers
Printers Folder
printers
Quicktime (If Installed)
QuickTime.cpl
Regional Settings
intl.cpl
Registry Editor
regedit
Registry Editor
regedit32
Removable Storage
ntmsmgr.msc
Removable Storage Operator Requests
ntmsoprq.msc
Resultant Set of Policy
rsop.msc
Resultant Set of Policy (XP Prof)
rsop.msc
Scanners and Cameras
sticpl.cpl
Scheduled Tasks
control.exe schedtasks
Security Center
wscui.cpl
Services
services.msc
Shared Folders
fsmgmt.msc
Shuts Down Windows
shutdown
Sounds and Audio
mmsys.cpl
Spider Solitare Card Game
spider
SQL Client Configuration
cliconfg
System Configuration Editor
sysedit
System Configuration Utility
msconfig
System File Checker Utility
sfc
System Properties
sysdm.cpl
Task Manager
taskmgr
Telnet Client
telnet
User Account Management
nusrmgr.cpl
Utility Manager
utilman
Windows Firewall
firewall.cpl
Windows Magnifier
magnify
Windows Management Infrastructure
wmimgmt.msc
Windows System Security Tool
syskey
Windows Update Launches
wupdmgr
Windows XP Tour Wizard
tourstart
Wordpad
write

Virus.gr tested quite a few different software companies to see how they would stack up against each other. How did the 147,000+ virus test pan out? Here are the results (the ones in bold are the ones I expected to do good):
1. Kaspersky version 6.0.0.303 - 99.62%
2. Active Virus Shield by AOL version 6.0.0.299 - 99.62%
3. F-Secure 2006 version 6.12.90 - 96.86%
4. BitDefender Professional version 9 - 96.63%
5. CyberScrub version 1.0 - 95.98%
6. eScan version 8.0.671.1 - 95.82%
7. BitDefender freeware version 8.0.202 - 95.57%
8. BullGuard version 6.1 - 95.57%
9. AntiVir Premium version 7.01.01.02 - 95.45%
10. Nod32 version 2.51.30 - 95.14%
11. AntiVir Classic version 7.01.01.02 - 94.26%
12. ViruScape 2006 version 1.02.0935.0137 - 93.87%
13. McAfee version 10.0.27 - 93.03%
14. McAfee Enterprise version 8.0.0 - 91.76%
15. F-Prot version 6.0.4.3 beta - 87.88%
16. Avast Professional version 4.7.871 - 87.46%
17. Avast freeware version 4.7.871 - 87.46%
18. Dr. Web version 4.33.2 - 86.03%
19. Norman version 5.90.23 - 85.65%
20. F-Prot version 3.16f - 85.14%
21. ArcaVir 2006 - 83.44%
22. Norton Professional 2006 - 83.18%
23. AVG Professional version 7.1.405 - 82.82%
24. AVG freeware version 7.1.405 - 82.82%
25. Panda 2007 version 2.00.01 - 82.23%
26. Virus Chaser version 5.0a - 81.47%
27. PC-Cillin 2006 version 14.10.1051 - 80.90%
28. VBA32 version 3.11.0 - 79.12%
29. ViRobot Expert version 4.0 - 76.22%
30. UNA version 1.83 - 75.44%
There’s the list and as you can see there are several towards the top that really shocked me. The one I am most happy about is the Active Virus Shield by AOL because it is offered to the public for free. Sure it branded as AOL but underneath it is all Kaspersky and this goes to show it.
I expected NOD32, Avast, and AVG to perform a little better than they did but NOD32 and AVG definitely fought back at the heuristic testing. Heuristic testing is extremely important because that is what gives an Antivirus the ability to catch a virus even it is not in the database. Here are the top 10 from that list:
1. Nod32 2.51.30 - 41503
2. Vba32 3.11.0 - 32911
3. VirIT 6.1.9 - 16469
4. AVG 7.1.405 Professional - 13624
5. AVG 7.1.405 freeware - 13624
6. Rising AV 18.41.30 - 12214
7. McAfee 10.0.27 - 10708
8. Ikarus 5.19 - 7191
9. F-Prot 6.0.4.3 beta - 6247
10. Ukrainian National Antivirus 1.83 - 5506
One thing is for sure and that is Norton needs some work for as much as it costs. So many people rely on Symantec’s software because that is what comes installed on most computers but it obviously won’t provide the protection that is needed.
I fix computers for people all of the time and when I find that their Antivirus subscriptions have expired I normally install Avast. After seeing these tests it definitely makes me ponder using Active Virus Shield by AOL because of the high ranking. Avast does have the Web Shield which stops malicious attacks through your Web browser and I really like that feature. I wonder what is more important, the overall ability to find a virus or being able to block Web attacks?
(via cybernet)
Technorati Tags:
Kaspersky version 6.0.0.303, Active Virus Shield by AOL version, F-Secure 2006 version, BitDefender Professional version, CyberScrub version 1.0, eScan version 8.0.671.1, BitDefender freeware version 8.0.2021, BullGuard version 6.1AntiVir Premium version 7.01.01.02, Nod32, AntiVir Classic version, ViruScape, McAfee, Avast, Norton, AVG, Panda 2007, Virus Chaser, PC-Cillin
Adsense program is a popular web advertising program which provides a good income source for many websites. There are well defined terms of service to strictly adhere to when participating in the program.
On my visit through sites and forums, I daily notice several instances of misuse of Adsense ads. So here a few helpful Google Adsense tips, probably many you already know, and few you might gain by knowing now. These adsense faq are all picked from the Program Policies, Terms and Conditions and FAQ itself and presented in a simplified manner.
1. Never click your own adsense ads or get them clicked for whatever reason. You know this one very well. This is a surefire way to close you Adsense account. Never tell your office associates or friends to click on them. Keep a check if your family or children are busy increasing your income by clicking your ads and indirectly trying to stop your income. Dont even think of offering incentives for clicks, using automated clicking tools, or other deceptive software. Adsense is very smart to detect fraudulent clicks. Check the ads which appear on your pages by the Google Preview tool if required.
2. Never change the Adsense code. There are enough means of adsense optimization & customizations available to change the colour, background or border to suit your needs. Do whatever you want to do outside the code, never fiddle within the ad or the search code. They know it when you do. The search code has more limitations to colour and placement, but you should adhere to the rules. The code may stop working and violates the TOS.
3. Do not place more than 3 ad unit and 1 ad links or 2 adsense search boxes on any web page. Anyway, ads will not appear in those units even if you place more ad units. But this is the limit they set, so it is better to stick to it.
4. Do not run competitive contextual text ad or search services on the same site which offer Google Adsense competition in their field. Never try to create link structures resembling the adsense ads. Never use other competitive search tools on the same pages which have Adsense powered Google search. They do allow affiliate or limited-text links.
5. Do not disclose confidential information about your account like the CTR, CPM and income derived via individual ad units or any other confidential information they may reveal to you. However, you may reveal the total money you make as per recent updates to the TOS.
6. Label headings as “sponsored links” or “advertisements” only. Other labels are not allowed. I have seen many sites label ads with other titles. Dont make your site a target in a few seconds gaze.
7. Never launch a New Page for clicked ads by default. Adsense ads should open on the same page. You may be using a base target tag to open all links in a new window or frame by default. Correct it now as they do not want new pages opening from clicked ads.
8. One Account suffices for Multiple websites. You do not need to create 5 accounts for 5 different websites. One account will do. If you live in the fear that if one account is closed down for violation of TOS, believe me they will close all accounts when they find out. You can keep track of clicks by using channels with real time statistics. They will automatically detect the new site and display relevant ads.
9. Place ads only on Content Pages. Advertisers pay only for content based ads. Content drives relevant ads. Although you might manage some clicks from error, login, registration, “thank you” or welcome pages, parking pages or pop ups, it will get you out of the program.
10. Do not mask ad elements. Alteration of colours and border is a facility to blend or contrast ads as per your site requirements. I have seen many sites where the url part is of the same colour as the background. While blending the ad with your site is a good idea, hiding relevant components of the ads is not allowed. Also do not block the visibility of ads by overlapping images, pop ups, tables etc.
11. Do not send your ads by email. Html formatted emails look good and allow placement of these javascript ads. But it is not allowed as per TOS. You do not want impressions registering on their logs from any email even once. They are watching!
12. Keep track of your content. So Adsense is not allowed on several non content pages. But it is also not allowed on several content pages too. Do not add it on web pages with MP3, Video, News Groups, and Image Results. Also exclude any pornographic, hate-related, violent, or illegal content.
13. Do not alter the results after ad clicks or searches - Ensure you are not in any way altering the site which the user reaches to after clicking the ads. Do not frame, minimize, remove, redirect or otherwise inhibit the full and complete display of any Advertiser Page or Search Results Page after the user clicks on any Ad or Search results.
14. Avoid excessive advertising and keyword stuffing - Although the definition of ‘excessive’ is a gray area and is subject to discretion, yet Google adsense with correct placement, focused content and high traffic will get you much more income than other programs, so excessive advertising is not required. Keyword stuffing does target better focused ads, but overdoing it is not required.
15. Ensure you Language is Supported - Adsense supports “Chinese (simplified), Japanese, Danish, Korean, Dutch, Norwegian, English, Polish, Finnish, Portuguese, French, Russian, German, Spanish, Hungarian, Swedish, Italian and Turkish”. In addition, AdSense for search is available in Czech, Slovak, and Traditional Chinese. If your web pages language is not supported, do not use the code on such pages.
Update:
16. Only single referral button per product per page - With the launch of the google adsense referral program, you are allowed to put only one referral button for adsense referral, adwords referral, and Firefox with google toolbar referral
17. Do not specify Google ads as your alternate ads. - Several services like Chitika eminimalls allow you to place alternate urls, when a targeted paying ad cannot be displayed. This involved creating an simple html page and putting the ad to be displayed instead. Even Adsense allows an alternate url feature instead of displaying public service ads. But never use Adsense ads as alternate urls.
18. Add Borders betweem Images and text ads - It was a common policy to increase CTR by placing same number of images as the number of text ads, which falsely gave the impression that the text ads represented an explanation to these images. Insert a border when placing images and text ads in such a manner, to avoid confusing readers to falsely click ads.
Whenever in doubt, it is better to ask for adsense help from the learned staff of Google Adsense. They are very helpful!
if you like it digg it.if u are a publisherits worth a digg.
How to optimize WordPress blog for maximum search engine optimization
Posted by Mohammed Tabraiz Ali
getting more popular by the day. It enables people to set up a blog, and even a complete website within minutes.
I get asked for specific SEO tips for WordPress very often. Basically all the ‘usual’ SEO stuff is also applicable for WordPress.
But besides that, there are a few special tips for WordPress I’d like to share with you.
1. Use Permalinks
Be sure to use Permalinks on your blog.
By default WordPress uses web URLs which have question marks and lots of numbers in them. These links may be hard to spider for search engines, and your posts may not be indexed as fast and as thoroughly as you want to.
However, WordPress offers you the ability to create a custom URL structure for your permalinks and archives.
You can find this option in your Admin panel. Choose ‘Options’ in the menu and there ‘Permalinks’.
This brings us immediately to Tip 2:
2. Place your titles up front in your URLs
In the Permalinks section you can choose the ‘Date and name based’ option.
This will place the year, month, day and post title in your URL.
For SEO purposes it’s better to have your post title up front. So instead you should go for the ‘Custom’ option and put in something like:
/%postname%/%year%/%monthnum%/%day%/
This will give you a URL like this:
http://www.seo-portal.com/section-targeting-for-adsense/2006/07/06/
3. Tags
Tags are a great SEO addition to your blog. They enable search engines to crawl your website more easily and create specific pages for your tags/keywords.
You can install the Ultimate Tag Warrior plug-in on your WordPress blog.
4. Page Titles
Make sure you add good titles to your pages. We discussed putting the post title up front in your URL. You should do the same thing for your titles.
You can do this by changing the <> tag in your header.php (located in wp-content/themes/your theme/)
You can use the following code in order to get your post title in front, followed by your blog name:
<>< ? php wp_title(); ? > : < ? php bloginfo('name'); ? > < /title >
5. Choose your post titles carefully
Your post titles should be as clear as possible, and directly relevant to your post. Don’t stuff your titles with keywords targeting your whole blog.
Choose your keywords carefully per post, and include those words in your post title.
6. Autolinks
Cross link to your own posts and pages. Do this by linking your keywords to the relevant postings.
To simplify this, you can install the SH-Autolink plug-in.
7. Related Posts
Put in links to related posts . This helps search engines crawl your site and may even make your visitors stay a little longer.
You can get a plug-in for this here.
8. Ping Services
Every time you post or edit a post or page, your WordPress blog can notify relevant sites that you have updated your blog.
Be sure to use this feature!
You can set up this feature in Options >> Writing. You can find a list of sites to ping on the WordPress site.
9. Google Sitemaps
Google has a tool for webmasters called Google Sitemaps. This will help Google index your website, and let’s you tell Google which pages are the most important.
If you make use of this feature, you will be able to identify the searches that brought up your site in results.
You can use this plug-in to automatically create a site-map for your WordPress blog.
10. Categories
Categories help you organize your content. If you have permalinks turned on, you can make the category names appear in your URLs.
This is also why it is very important to name your categories carefully. Try using relevant and search engine friendly keywords.
WordPress enables you to make use of subcategories, sub-subcategories etc. etc. In this way you can focus on more narrow keyword phrases.
Consider the following example:
You have a website about selling cameras. You could organize your articles/posts like this:
cameras >> digital cameras >> SLR >> Nikon
If a user would be searching for “digital SLR camera Nikon” the deepest nested category would have a good optimized URL for this search. The URL could be something like this:
www.yoursite.com/cameras/digital-cameras/SLR/nikon/
You can make use of the King Categories Widget to organize your categories.
(via pandla)
Read More......I have found the following guide to convert avi files to KVCD and its works great for me. Avi which is about 700mb in size can be converted into kvcd which works on most dvd players and its size reduses to 571mb and works fine with my dvd player and this process only takes about 5 to 6 hours
I just wanted to put together a simple step by step guide to those who dont like using too many tools and software and dont understand a whole lot about settings.
Software used:
GSpot
VirtualDub
TMPGEnc
BeSweet
1. First you have to determine the quality of your source AVI file. This is because if you want to use a resolution of 528 x 480 on your TMPGEnc template you must have a higher resolution on your source AVI file.
a. Open GSpot, select File --> Open, and open the AVI file.
b. Write down the relevant information. The ?x:y? information will tell you how high your KVCD template resolution can be. It?s also usable the size of the file, the FPS, the bit rate of the video and audio. If your resolution is lower than 528 x 480 you should use a 352 x 240 template.
2. Split the audio and video
a. Open VirtualDub, select File --> Open video file?, and open the AVI file.
b. Select Audio --> Direct Stream Copy and Audio --> Source Audio.
c. Select File --> Save Wav?, select a file name and click OK.
d. After the audio is done, select Audio --> No Audio.
e. Select Video Direct Stream Copy.
f. Select File --> Save as AVI?, select a file name and click OK.
g. You?ll end up with an AVI file with just the video, and a wav file with just the audio.
3. Convert wav to mp2:
a. Open BeSweet
b. On Input, select the wav created in the pervious step.
c. Check ?Use MPA Decoder? and ?Downconvert Sample Rate?
d. On the Output drop down menu, select MP2.
e. I usually use 128KB/s so click on the Copy Command to Clipboard, then open the command prompt, paste the command and edit the ?B? parameter to 128 and press enter.
f. You should get a MP2 file with the sound of the movie.
4. Encode the video to m1v.
a. Open TMPGEnc. If the project wizard comes up, just click on cancel.
b. On the lower part of the screen click on ?Load? and select the KVCD Template with the best possible resolution.
c. This means:
Higher than ¦ Lower Than ¦ Resolution
__________________________________
720 x 480 ¦ -------------- ¦ 720 x 480
528 x 480 ¦ 720 x 480 ¦ 528 x 480
352 x 240 ¦ 528 x 480 ¦ 352 x 240
------------ ¦ 352 x 240 ¦ Too low quality
d. On ?Video Source? click on ?Browse? and select the avi file created by Virtualdub on step 2 of this guide.
e. On ?Stream Type? select ?ES (Video Only)?
f. Here come the tricky part? if you have CQmatic you can easily calculate the CQ that your encoding needs to fit on a single CD, but if you don?t have it, you can start the encoding, and wait until at least 5% of encoding, and determine, from the size of the m1v file if you have to lower the CQ or not. To do this, divide the size of the m1v file when it gets to 5% of encoding by 0.05 and if is greater than 550MB or so, it might not fit depending also on the size of the audio file. The more bitrate the movie has the lower the CQ has to be.
g. If you do have to change the CQ, first stop the encoding by clicking on ?Stop?, then click on ?Settings?, select the ?Video? tab, click on ?Setting? on the ?Rate Control Mode? and set your CQ, click on ?OK? and ?Start? the encoding again until you get the results you want.
5. Multiplex the video and audio files.
a. I simply use the MPEG Tools on TMPGEnc. So select File --> MPEG Tools?, select the Simple Multiplex tab.
b. On ?Video Input? click on ?Browse? and select the m1v file created on step 4.
c. On ?Audio Input? click on ?Browse? and select the MP2 file created on step 3.
d. On ?Output File? click on ?Browse? and select the output MPG file name and location.
e. Click on Run and wait a few minutes.
6. Toast it
a. Open Nero Burning ROM
b. Select Video CD and uncheck ?Create standard compliant CD?
c. If you want a menu, on the ?Menu? tab check ?Enable Menu?. I like to download the image of movie poster I?m burning, and put it on a menu as the ?Background picture? on the menu tab.
d. Click on ?New?
e. Find the MPG file created on step 5 on the right hand window, and drag it to the left window. If you got your CQ right you should not have gone pass the red line of 700MB.
f. Burn the CD and try it on your DVD standalone player. Please note that there are some DVD players that only play 352x240 KVCD and the ones that play them all. I have a Pioneer DV-355 and it plays all KVCDs
(by rashid)
Google are clearly gathering information about us but refuse to tell us why. It's nothing new to us, but while they cannot control normal SERPs, they do however control who is viewing what and when.
We run Google adverts in order to survive. Does this mean we shouldn't share the information below? If you know an alternative way to sustain costs please get in touch.
Please note, Google does not track you by simply viewing pages containing their adverts.
1. Google's immortal cookie:
Google was the first search engine to use a cookie that expires in 2038. This was at a time when federal websites were prohibited from using persistent cookies altogether. Now it's years later, and immortal cookies are commonplace among search engines ; Google set the standard because no one bothered to challenge them. This cookie places a unique ID number on your hard disk. Anytime you land on a Google page, you get a Google cookie if you don't already have one. If you have one, they read and record your unique ID number.
2. Google records everything they can:
For all searches they record the cookie ID, your Internet IP address, the time and date, your search terms, and your browser configuration. Increasingly, Google is customizing results based on your IP number. This is referred to in the industry as "IP delivery based on geolocation."
3. Google retains all data indefinitely:
Google has no data retention policies. There is evidence that they are able to easily access all the user information they collect and save.
4. Google won't say why they need this data:
Inquiries to Google about their privacy policies are ignored. When the New York Times (2002-11-28) asked Sergey Brin about whether Google ever gets subpoenaed for this information, he had no comment.
5. Google hires spooks:
Matt Cutts, a key Google engineer, used to work for the National Security Agency. Google wants to hire more people with security clearances, so that they can peddle their corporate assets to the spooks in Washington.
6. Google's toolbar is spyware:
With the advanced features enabled, Google's free toolbar for Explorer phones home with every page you surf, and yes, it reads your cookie too. Their privacy policy confesses this, but that's only because Alexa lost a class-action lawsuit when their toolbar did the same thing, and their privacy policy failed to explain this. Worse yet, Google's toolbar updates to new versions quietly, and without asking. This means that if you have the toolbar installed, Google essentially has complete access to your hard disk every time you connect to Google (which is many times a day). Most software vendors, and even Microsoft, ask if you'd like an updated version. But not Google. Any software that updates automatically presents a massive security risk.
7. Google's cache copy is illegal:
Judging from Ninth Circuit precedent on the application of U.S. copyright laws to the Internet, Google's cache copy appears to be illegal. The only way a webmaster can avoid having his site cached on Google is to put a "noarchive" meta in the header of every page on his site. Surfers like the cache, but webmasters don't. Many webmasters have deleted questionable material from their sites, only to discover later that the problem pages live merrily on in Google's cache. The cache copy should be "opt-in" for webmasters, not "opt-out."
8. Google is not your friend:
By now Google enjoys a 75 percent monopoly for all external referrals to most websites. Webmasters cannot avoid seeking Google's approval these days, assuming they want to increase traffic to their site. If they try to take advantage of some of the known weaknesses in Google's semi-secret algorithms, they may find themselves penalized by Google, and their traffic disappears. There are no detailed, published standards issued by Google, and there is no appeal process for penalized sites. Google is completely unaccountable. Most of the time Google doesn't even answer email from webmasters.
9. Google is a privacy time bomb:
With 200 million searches per day, most from outside the U.S., Google amounts to a privacy disaster waiting to happen. Those newly-commissioned data-mining bureaucrats in Washington can only dream about the sort of slick efficiency that Google has already achieved
10.But Google Is The Best In Search Engines :
Last but not the least i say that google is the best seach engine on Earth if it does not do Spy on us.
If u like this dont forget to digg this
Read More......Hey guys, did you know that you can REALY watch movies in paint ?
Here's what you gotta do :
> Open your favorite movie palyer and play the move (I played the .mpg format in Winamp)
> Hit "PrintScreen", keep playing the movie in the player, dont stop it.
> Open MsPaint.
> Select "Edit>Paste" Or Hit "CTRL+V"
> Presto! You can watch movies in Paint!
> But there are no Pause, Next, Previous, Stop etc. buttons
> Spead this fact to all your friends and show how COOL things you can do with Paint!
> Experiment with other formats too, it doesn't play DivX, Flash movies, etc. Microsoft hasn't revealed this i think. MsPaint is GREAT
if u like it dont forget to digg this

Some secrets tht u didnt know abt WinXP:-
Here go the secrets...
Disable Recycle Bin
You can delete files immediately, without having them move to the Recycle Bin first. Go to the Start menu, select Run..and type ' gpedit.msc'; then select User Configuration, Administrative Templates, Windows Components, Windows Explorer and find the Do not move deleted files to the Recycle Bin setting. Set it. Poking around in gpedit will reveal a great many interface and system options, but take care-some may stop your computer behaving as you wish. (Professional Edition only).
Lock Workstation
You can lock your XP workstation with two clicks of the mouse. Create a new shortcut on your desktop using a right mouse click, and enter 'rundll32.exe user32.dll,LockWorkStation' in the location field. Give the shortcut a name you like. That's it-just double click on it and your computer will be locked. And if that's not easy enough, Windows key + L will do the same.
Show Hidden Installed products in Add/Remove Programs
XP hides some system software you might want to remove, such as Windows Messenger, but you can tickle it and make it disgorge everything. Using Notepad or Edit, edit the text file /windows/inf/sysoc.inf, search for the word 'hide' and remove it. You can then go to the Add or Remove Programs in the Control Panel, select Add/Remove Windows Components and there will be your prey, exposed and vulnerable.
System Events from DOS
For those skilled in the art of DOS batch files, XP has a number of interesting new commands. These include 'eventcreate' and 'eventtriggers' for creating and watching system events, 'typeperf' for monitoring performance of various subsystems, and 'schtasks' for handling scheduled tasks. As usual, typing the command name followed by /? will give a list of options-they're all far too baroque to go into here.
IP v6
XP has IP version 6 support-the next generation of IP. Unfortunately this is more than your ISP has, so you can only experiment with this on your LAN. Type 'ipv6 install' into Run… (it's OK, it won't ruin your existing network setup) and then 'ipv6 /?' at the command line to find out more. If you don't know what IPv6 is, don't worry and don't bother.
Kill Tasks from Command Line
You can at last get rid of tasks on the computer from the command line by using 'taskkill /pid' and the task number, or just 'tskill' and the process number. Find that out by typing 'tasklist', which will also tell you a lot about what’s going on in your system.
Zips or Folders
XP will treat Zip files like folders, which is nice if you've got a fast machine. On slower machines, you can make XP leave zip files well alone by typing 'regsvr32 /u zipfldr.dll' at the command line. If you change your mind later, you can put things back as they were by typing 'regsvr32 zipfldr.dll'.
ClearType Technology
XP has ClearType—Microsoft's anti-aliasing font display technology-but doesn't have it enabled by default. It's well worth trying, especially if you were there for DOS and all those years of staring at a screen have given you the eyes of an astigmatic bat. To enable ClearType, right click on the desktop, select Properties, Appearance, Effects, select ClearType from the second drop-down menu and enable the selection. Expect best results on laptop displays. If you want to use ClearType on the Welcome login screen as well, set the registry entry HKEY_USERS/.DEFAULT/Control Panel/Desktop/FontSmoothingType to 2.
Remote Assistance
You can use Remote Assistance to help a friend who's using network address translation (NAT) on a home network, but not automatically. Get your pal to email you a Remote Assistance invitation and edit the file. Under the RCTICKET attribute will be a NAT IP address, like 192.168.1.10. Replace this with your chum's real IP address-they can find this out by going to www.whatismyip.com—and get them to make sure that they've got port 3389 open on their firewall and forwarded to the errant computer.
Auto Update Balloon Tips
Windows XP can be very insistent about you checking for auto updates, registering a Passport, using Windows Messenger and so on. After a while, the nagging goes away, but if you feel you might slip the bonds of sanity before that point, run Regedit, go to HKEY_CURRENT_USER/Software/Micr@$@ft/Windows/Current Version/Explorer/Advanced and create a DWORD value called EnableBalloonTips with a value of 0.
Auto Login
You can start up without needing to enter a user name or password. Select Run… from the start menu and type 'control userpasswords2', which will open the user accounts application. On the Users tab, clear the box for Users Must Enter A User Name And Password To Use This Computer, and click on OK. An Automatically Log On dialog box will appear; enter the user name and password for the account you want to use.
Fast Start Menu
The Start Menu can be leisurely when it decides to appear, but you can speed things along by changing the registry entry HKEY_CURRENT_USER/Control Panel/Desktop/MenuShowDelay from the default 400 milliseconds to something a little snappier. Like 0.
Visual Songs
Windows Media Player will display the cover art for albums as it plays the tracks-if it found the picture on the Internet when you copied the tracks from the CD. If it didn't, or if you have lots of pre-WMP music files, you can put your own copy of the cover art in the same directory as the tracks. Just call it folder.jpg and Windows Media Player will pick it up and display it.
Shortcuts
Windows key + Break brings up the System Properties dialogue box; Windows key + D brings up the desktop; Windows key + Tab moves through the taskbar buttons.
Oh!! no Crashes…
It boasts how long it can stay up. Whereas previous versions of Windows were coy about how long they went between boots, XP is positively proud of its stamina. Go to the Command Prompt in the Accessories menu from the All Programs start button option, and then type 'systeminfo'. The computer will produce a lot of useful info, including the uptime. If you want to keep these, type 'systeminfo > info.txt'. This creates a file c
alled info.txt you can look at later with Notepad. (Professional Edition only).
(via dctorrennt)
I am going to explain how to rip a DVD or how to convert your DVD media files to AVI files in a very easy way.
The softwares you need are:
1- Dvd Decrypter
You can download this software here http://www.soft32.com/download_75586.html
There have been some beta releases of Autogk but i would recommend that you use the stable version.
After installing these softwares put ur dvd into ur dvd rom and start the dvd decrypter. From the mode menu select the IFO mode as shown below. Choose a destination and click on the cd icon to start decrypting. ( U shud keep in mind the space needed to decrypt while saving it to ur chosen destination. Approximately 7-8 gb should be available).
U will see the following picture. wait for the decrypter to finish its job.

Now open autogk and click on dvd input and browse to the VIDEO_TS folder as shown below.
Select the path where u would like to save ur file.
Select the audio track and the subtitles if available and the output size. use the 2cds 1400mb option for best results and click on Advanced Settings.
To ensure best results leave the settings as shown and click on ok.
Click on add job and hit start.
This process may take from 2-7 hours to complete depending upon your computer.
I recommend that u do this process when ur computer is idle.
Hope this helps.


Yet and again i have come back with an intresting topic.As the title suggest we are going to fit 2-3 movies in a dvd.The software required is D.I.K.O.It can be downloaded at http://www.vmesquita.com/en/index.htm.
The most amazing part is that the software is FREE.
CONFIGURATION:
The first time we start D.I.K.O., we will need to very the configuration.
Note: screen shots are based on the 1.47 Gold version. Screens for the free version are similar.

Now click the "CONFIGURATION" button. The following screen will appear:

In the first screen (tab called "Path") we set our working directory. Make sure this points to a directory where you have a couple of Gbytes free. I always make sure I have about 8 Gb free in that folder.
Now go to the next tab (called "Parameters"). Copy the settings as shown in the image below:

Details:
MODE
Select if you want to make a DVD (KDVD) or a Super VCD (KSVCD).
SYSTEM
Select your TV System here. PAL is commonly used in Europe, NTSC in the USA.More details can be found on the Video Formats page (look at the bottom).Note from Riez: mixing PAL and NTSC movies might cause issues!
VIDEO ENCODER
Select FreeEnc to begin with (I'm pretty pleased with it).If you want to use CCE, then after selecting this, go back to the "Path" tab and set the "ECLCCE" path to you CCE directory.
AUDIO ENCODERI
use BeSweet since Soft Encode seems to be a commercial application (it is discontinued however).
MEDIA SIZEI
have set mine to 4490 Mb with 180 Mb overhead. Slightly more than the default. Either will work just fine.However, when using DVD-R (since this media type does not support overbunring) you're stuck with the maximum (default) value of 4482 Mb.
OTHER SETTINGSI
have checked "Ignore Pulldown failure" and "remove Temp files".Optionally, if you do the encoding during the night, you can check "Shutdown when finished processing".The option "Use AviSynth Monitor" can be practical - if you're an expert - to monitor problems (never had a use for it).Also note that there have been reports that AviSynth Monitor may actually cause problems! Naturally you can set the interface language to your language, however in this guide we stick with English.
Now we go to the next tab: "Authoring".
We have 2 options here:
1) We author our DVD ourselves using DVDLab, TMPGEnc DVD Author or another DVD authoring tool.
In this window uncheck everything, including the "Author Disc" option.Authoring your DVD's yourself gives you more freedom in designing my own layout, chapters, and functionality you would like.But it will also take more time ...
2) We have D.I.K.O. Auhtor our DVD
If you want to use this option (definitly less work), then make sure "Author Disc" is checked.This option will create a directory called "author" holding two folders: "AUDIO_TS" and "VIDEO_TS" with the complete DVD in it.
The other settings are the default languages you wish to use for Audio (Sound Language) and subtitles (Subs language).
The chapter option is default set to 5 minutes. Which means that D.I.K.O. will generate a chapter every 5 minutes.You can change this value to 5, 10, 15, 20 minutes, or "Don't add chapters". Personally I would recommend keeping it a 5 minutes.You can check "Create DVD Image" (if you use Nero then this is not required), which will create an ISO file which most burning software can burn. I usually have Nero handle this problem, so I leave it unchecked.You can also check the option "Burn using DVD Decrypter". This will burn the DVD right away once D.I.K.O. finished creating the image. Again: I prefer to have Nero do the burning. So I leave it unchecked. Leaving this unchecked also offers you the option to do a quality check before burning your conversion to a DVD.
The next tab "Video" is used for setting encoder specific settings, here we assume that we use FreeEnc:

For best quality:compression ratio I always select "Multipass VBR". For top speed conversion select "1 Pass VBR".
The option overscan should be set to zero.
"Resolution" depends on your TV system: PAL uses 704x576, NTSC uses 704x480. For some movies it might make sense to use a lower resolution. However so far I have not had any movie where the default value didn't work properly. See also the the Video Formats page.
The next tab is "Audio". The default settings are just fine.Default 2.0 audio (stereo) is set to 160 kbps. If you selected "Soft Encode" on "Parameters" tab, then 5.1 audio is set to 384 kbps
converting movies:
So now we're back at the start window. Click the "New Conversion" button:


Note: The DVD option is not available in the free version!
I found that on average you can store between 4 and 7 hours of movie on a DVD with still a good quality.So that is about 2 to 4 movies, or about 11 episodes of your favorite show (right click an AVI, and select properties. This will show you the playback time of each individual AVI).
Adding a movie
Note: If you use the DVD Auhtoring feature; make sure you add the movies in the same order as you have set the buttons in the JPG image!
Click the "..." button next o the field "Movie File 1:".

If your movie is split in two parts (not uncommon, for example CD1 and CD2), the use the "Movie File 2:" to select the second part.Note that this should be the second part of THE SAME MOVIE!
Note: Optionally you can drag the AVI file into the "Movie File 1:" or "Movie File 2:" field.
Adding the next movie
If you want to add another movie, then click "Add Another Movie" and repeat the steps as described for adding a movie/avi.Only use this button if this is NOT your last movie!!!
Once you have added all your AVI's you can click the button "Start Conversion". then click ok.thats it coversion will start then.U will be able to play in standalone.
(via weethet)
Read More......
Subscribe to:
Posts (Atom)
